一、前置准备
1.1 环境准备
前面介绍过Apollo使用Docker分布式部署(opens new window)的方案,这里介绍下如何在k8s集群中部署,因为随着云原生的流行,大多数公司系统的交付都是以k8s的方式进行管理运行,本次使用涉及版本如下:
- k8s版本: 1.26
- helm版本: v3.12.0
- apollo版本: 1.9.1 注意
- 部署环境:
-
- 开发环境 dev命名空间
-
- 生产环境 prod命名空间
- 注意: 这里的版本是当时helm仓库最新版本,自定义的话需要自行修改镜像版本。
关于使用k8s部署的更多参考,点击直达
(opens new window)官方介绍
1.2 数据库准备
需要注意,每个环境都需要有apolloconfigdb库,apolloportaldb部署一个即可数据库一般企业为了稳定性大多都采用云数据库,这里我们也是一样,直接使用集群外云商的数据库,因此,我们只需要按照常规部署中,把数据库脚本导入值对应的库中即可,所需数据库脚本:
apolloportaldb地址: https://github.com/apolloconfig/apollo/tree/1.9.1/scripts/sql/apolloportaldb.sql
apolloconfigdb地址: https://github.com/apolloconfig/apollo/tree/1.9.1/scripts/sql/apolloconfigdb.sql
二、部署
2.1 添加Apollo Helm Chart仓库
[root@k8s-master01 ~]# helm repo add apollo https://charts.apolloconfig.com
[root@k8s-master01 ~]# helm search repo apollo
NAME                    CHART VERSION   APP VERSION DESCRIPTION
apollo/apollo-portal    0.6.1           2.1.0       A Helm chart for Apollo Portal
apollo/apollo-service   0.6.1           2.1.0       A Helm chart for Apollo Config Service and Apol...
2.2 获取应用Charts包
通过查看版本,我们可以看到默认版本是2.1.0,这里我们需要部署的是1.9.1版本,因此我们把资源下载到本地进行相关资源的配置apollo-portal 相关配置
[root@k8s-master01 ~]# helm pull apollo/apollo-portal
apollo-configservice和apollo-adminservice
[root@k8s-master01 ~]# helm pull apollo/apollo-service
2.3 dev环境部署
这里的dev环境部署在dev命名空间下,并且我们只部署apollo-configservice和apollo-adminservice部署即可[root@k8s-master01 ~]# tar -xf apollo-service-0.6.1.tgz
[root@k8s-master01 ~]# tree apollo-service
apollo-service
├── Chart.yaml
├── templates
│ ├── deployment-adminservice.yaml
│ ├── deployment-configservice.yaml
│ ├── _helpers.tpl
│ ├── ingress-adminservice.yaml
│ ├── ingress-configservice.yaml
│ ├── NOTES.txt
│ ├── service-adminservice.yaml
│ ├── service-configdb.yaml
│ └── service-configservice.yaml
└── values.yaml2.3.1 修改镜像版本
以下修改均为apollo-service/values.yaml文件

apollo-configservice

tag默认为空,这里修改为1.9.1
configService:
name: apollo-configservice
fullNameOverride: ""
replicaCount: 2
containerPort: 8080
image:
repository: apolloconfig/apollo-configservice
tag: "1.9.1"
pullPolicy: IfNotPresent-
apollo-adminservice
tag默认为空,这里修改为1.9.1
adminService:
name: apollo-adminservice
fullNameOverride: ""
replicaCount: 2
containerPort: 8090
image:
repository: apolloconfig/apollo-adminservice
tag: "1.9.1"
## 2.3.2 数据源修改configdb:
name: apollo-configdb
apolloconfigdb host
host: "rm-*****.mysql.rds.aliyuncs.com"
port: 3306
dbName: ApolloConfigDB
apolloconfigdb user name
userName: "root"
apolloconfigdb password
password: "*****"
connectionStringProperties: characterEncoding=utf8
service:
whether to create a Service for this host or not
enabled: false
fullNameOverride: ""
port: 3306
type: ClusterIP
## 2.3.3 应用部署[root@k8s-master01 ~]# helm install apollo-service-dev -f apollo-service/values.yaml -n dev apollo/apollo-service
NAME: apollo-service-dev
LAST DEPLOYED: Tue Jul 25 15:05:31 2023
NAMESPACE: dev
STATUS: deployed
REVISION: 1
TEST SUITE: None
NOTES:
Meta service url for current release:
echo https://apollo-service-dev-apollo-configservice.dev:8080
For local test use:
export POD_NAME=$(kubectl get pods --namespace dev -l "app=apollo-service-dev-apollo-configservice" -o jsonpath="{.items[0].metadata.name}")
echo https://127.0.0.1:8080
kubectl --namespace dev port-forward $POD_NAME 8080:8080
Urls registered to meta service:
Config service: https://apollo-service-dev-apollo-configservice.dev:8080
Admin service: https://apollo-service-dev-apollo-adminservice.dev:8090
注意
此处我们需要注意对应环境的Meta Server地址,需要记录下来,apollo-portal和后面应用客户端都需要用到,另外由于我们这里不同命名空间部署,因此需要注意后面portal服务与Config和Admin的通信问题。
## 2.3.4 查看pod启动状态

## 2.4 prod环境部署
这里的prod环境部署在prod命名空间下,这里我们不仅部署擦还有把apollo-portal一块部署
## 2.4.1 apollo-configservice和apollo-adminservice 部署
此两个应用我们只需要修改下values.yaml中数据库配置把数据源修改为对应的生产环境即可configdb:
name: apollo-configdb
apolloconfigdb host
host: "{prodMySQLHost}"
port: 3306
dbName: ApolloConfigDB
apolloconfigdb user name
userName: "root"
apolloconfigdb password
password: "*****"
connectionStringProperties: characterEncoding=utf8
service:
whether to create a Service for this host or not
enabled: false
fullNameOverride: ""
port: 3306
type: ClusterIP 部署的时候注意下指定prod命名空间[root@k8s-master01 ~]# helm install apollo-service-prod -f apollo-service/values.yaml -n prod apollo/apollo-service
NAME: apollo-service-prod
LAST DEPLOYED: Tue Jul 25 15:27:05 2023
NAMESPACE: prod
STATUS: deployed
REVISION: 1
TEST SUITE: None
NOTES:
Meta service url for current release:
echo https://apollo-service-prod-apollo-configservice.prod:8080
For local test use:
export POD_NAME=$(kubectl get pods --namespace prod -l "app=apollo-service-prod-apollo-configservice" -o jsonpath="{.items[0].metadata.name}")
echo https://127.0.0.1:8080
kubectl --namespace prod port-forward $POD_NAME 8080:8080
Urls registered to meta service:
Config service: https://apollo-service-prod-apollo-configservice.prod:8080
Admin service: https://apollo-service-prod-apollo-adminservice.prod:8090
## 2.4.2 apollo-portal部署[root@k8s-master01 ~]# tar -xf apollo-portal-0.6.1.tgz
[root@k8s-master01 ~]# tree apollo-portal
apollo-portal
├── Chart.yaml
├── templates
│ ├── deployment-portal.yaml
│ ├── _helpers.tpl
│ ├── ingress-portal.yaml
│ ├── NOTES.txt
│ ├── service-portaldb.yaml
│ └── service-portal.yaml
└── values.yaml
修改镜像版本,这里跟上面一样直接把tag修改为1.9.1,name: apollo-portal
fullNameOverride: ""
replicaCount: 1
containerPort: 8070
image:
repository: apolloconfig/apollo-portal
tag: "1.9.1"
pullPolicy: IfNotPresent
修改支持的环境,这里目前只有pro和dev,metaServers如果有其他命名空间,我们需要注意svc的地址,保证portal服务可以和哥各个环境的configservice和adminservice通信config:
spring profiles to activate
profiles: "github,auth"
specify the env names, e.g. dev,pro
envs: "dev,pro"
specify the meta servers, e.g.
dev: 注意这里命名空间
pro: https://apollo-configservice-pro:8080
metaServers: {"dev":"https://apollo-service-dev-apollo-configservice.dev:8080","pro":"https://apollo-service-prod-apollo-configservice:8080"}
specify the context path, e.g. /apollo
contextPath: ""
extra config files for apollo-portal, e.g. application-ldap.yml
files: {}
修改数据源相关配置portaldb:
name: apollo-portaldb
apolloportaldb host
host: "portalDBHost"
port: 3306
dbName: ApolloPortalDB
apolloportaldb user name
userName: root
apolloportaldb password
password: ****
connectionStringProperties: characterEncoding=utf8
ingress暴露portal管理界面配置ingress:
ingressClassName: nginx
enabled: true
annotations: {}
hosts:
- host: "apollo.tchua.com"
paths: ["/"应用安装部署[root@k8s-master01 ~]# helm install apollo-portal -f apollo-portal/values.yaml -n prod apollo/apollo-portal
NAME: apollo-portal
LAST DEPLOYED: Tue Jul 25 16:26:30 2023
NAMESPACE: prod
STATUS: deployed
REVISION: 2
TEST SUITE: None
NOTES:
Portal url for current release:
export POD_NAME=$(kubectl get pods --namespace prod -l "app=apollo-portal" -o jsonpath="{.items[0].metadata.name}")
echo "Visit https://127.0.0.1:8070 to use your application"
kubectl --namespace prod port-forward $POD_NAME 8070:8070
Ingress:
https://apollo.tchua.com/
## 2.4.3 查看应用部署

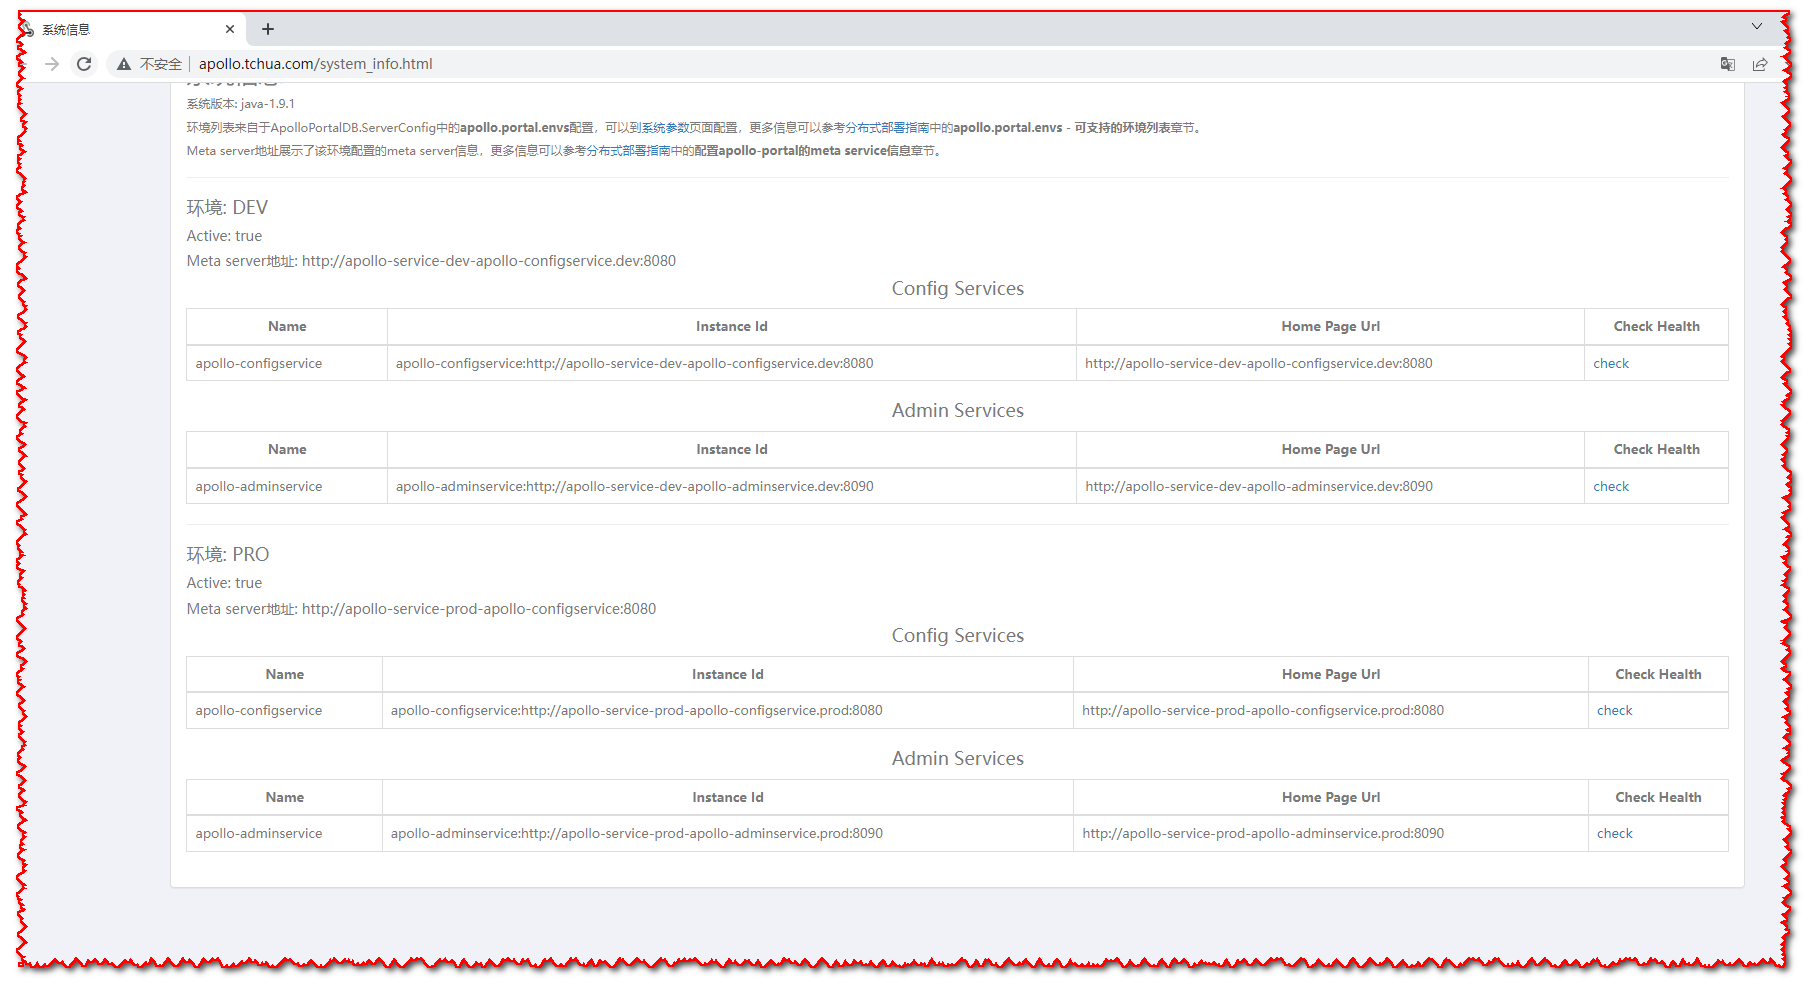
## 2.5 查看各环境应用注册
## 2.6 总结
### 2.6.1 helm在线部署
上面我们自定义镜像版本,还有数据源,都是通过下载应用的Charts包至本地进行修改(也推荐使用此方式),如果嫌麻烦我们还可以直接在线安装,安装时指定相关参数即可:
安装portalhelm install apollo-portal \
--set portaldb.host=1.2.3.4 \
--set portaldb.userName=apollo \
--set portaldb.password=apollo \
--set portaldb.service.enabled=true \
--set config.envs="dev\,pro" \
--set config.metaServers.dev=https://apollo-service-dev-apollo-configservice.dev:8080 \
--set config.metaServers.pro=https://apollo-service-prod-apollo-configservice:8080 \
--set replicaCount=1 \
-n prod \
apollo/apollo-portal
更多参数参考apollo-portal chart的可配置参数及其默认值

(opens new window)

    安装apollo-configservice和apollo-adminservice
helm install apollo-service-dev \
--set configdb.host=1.2.3.4 \
--set configdb.userName=apollo \
--set configdb.password=apollo \
--set configdb.service.enabled=true \
--set configService.replicaCount=1 \
--set adminService.replicaCount=1 \
-n dev \
apollo/apollo-service
更多参数参考apollo-service chart的可配置参数及其默认值

(opens new window)
### 2.6.2 客户端连接

对于同一个命名空间的应用,我们只需要连接apollo-configservice对应的svc地址即可,比如目前环境:

    dev:https://apollo-service-dev-apollo-configservice:8080
    prod: https://apollo-service-prod-apollo-configservice:8080

如果涉及到跨集群访问,无论是客户端访问configservice还是portal访问adminservice就需要我们把相关的资源映射出去,这里建议都使用Ingress的方式,当然更多可以参考官方介绍[地址](https://www.apolloconfig.com/#/zh/deployment/distributed-deployment-guide?id=_241344-%E6%8C%87%E5%AE%9Ameta-server%E8%BF%94%E5%9B%9E%E7%9A%84apollo-configservice%E5%9C%B0%E5%9D%80 "地址")
### 2.6.3 应用卸载
helm uninstall -n your-namespace apollo-portal
helm uninstall -n your-namespace apollo-service
